
Most Whirlpool hot water heater problems can be fixed with simple checks and routine maintenance.
I’ve worked on dozens of Whirlpool hot water heaters and trained service techs on common faults. This guide walks you through Whirlpool Hot Water Heater Troubleshooting with clear steps, safety tips, and real-world fixes. You will learn how to spot symptoms, perform safe tests, replace parts, and decide when to call a pro. Read on to gain practical skills and confidence for troubleshooting Whirlpool hot water heaters at home.

Common Symptoms and What They Mean
Many Whirlpool hot water heater problems show clear signs. Knowing the symptom helps you choose the right test and fix.
- No hot water. This usually points to a failed heating element, tripped breaker, or gas pilot/valve issue on gas models.
- Not enough hot water. Sediment build-up or a small tank size can limit hot water supply.
- Water too hot or fluctuating. A bad thermostat or dip tube issues often cause temperature problems.
- Strange noises. Rumbling and popping usually mean sediment under the tank heating element.
- Leaks. Loose connections, a failed T&P valve, or a corroded tank are common leak causes.
I’ve replaced elements and thermostats on Whirlpool electric models and flushed tanks to stop noises. A quick symptom check lets you avoid wasted time and parts.

Step-by-Step Whirlpool Hot Water Heater Troubleshooting Guide
Follow a simple order: observe, isolate, test, fix. This saves time and keeps you safe.
- Safety checks first
- Confirm electricity or gas is on or off before working.
- Turn off power at the breaker for electric models and shut off gas at the valve for gas units.
- Drain a small amount of water to test for leaks before deep work.
- Basic tests for no hot water
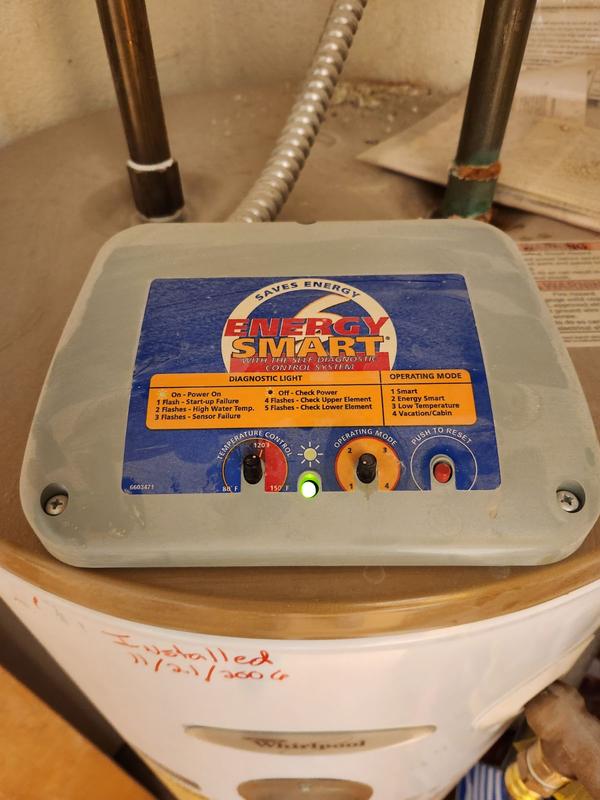
- Electric model: reset the high-limit or ECO button on the thermostat panel, then test breakers.
- Electric model: test heating elements with a multimeter for continuity.
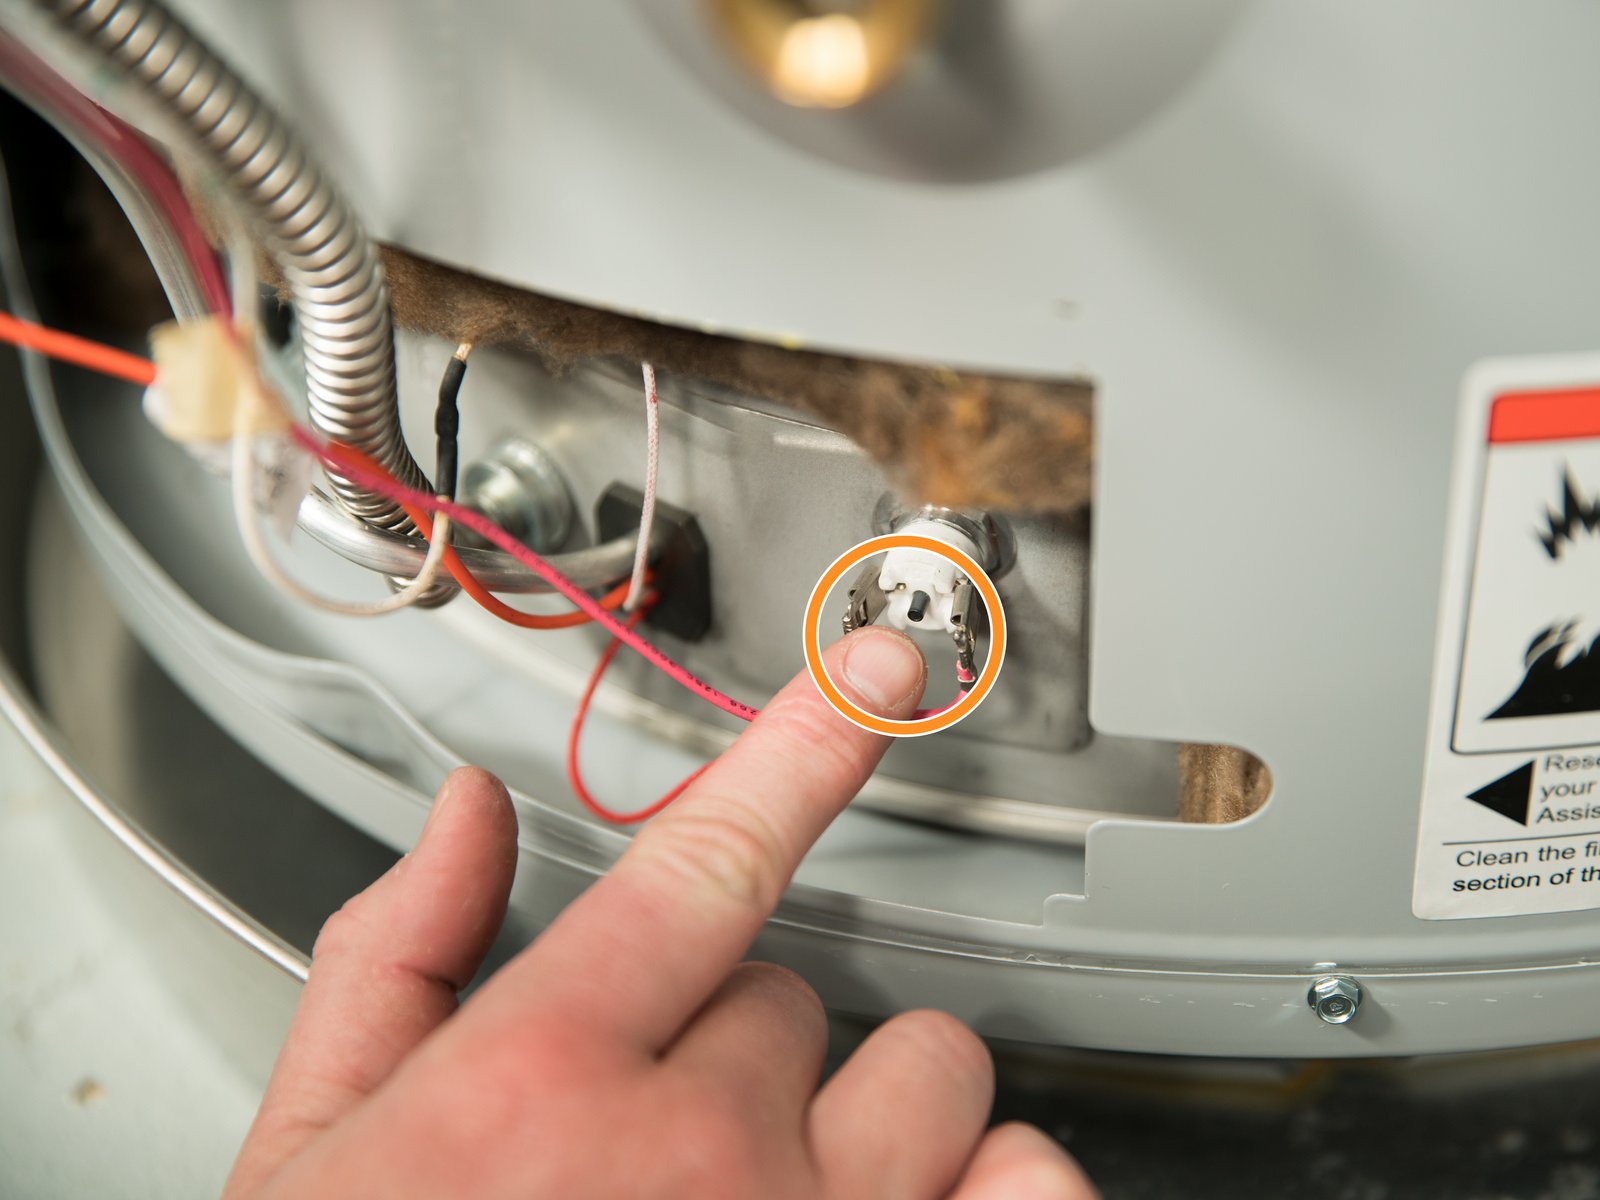
- Gas model: check pilot light or electronic ignition and confirm gas supply.
- If power and gas are fine, inspect thermostats and control boards.
- Fixing low hot water or temperature swings
- Flush tank to remove sediment that reduces capacity and causes noise.
- Test thermostats and replace if readings are off by more than a few degrees.
- Inspect the dip tube; a broken dip tube mixes cold with hot and reduces output.
- Handling leaks
- Tighten supply and drain connections. Replace worn fittings.
- Test T&P valve by lifting its lever; replace if it leaks or won’t seal.
- If the tank itself is leaking from corrosion, replacement is usually required.
- Electrical and control board issues
- Look for burned wires or loose connections at the thermostat and element terminals.
- Replace failed elements or thermostats with parts matched to Whirlpool specifications.
- For electronic control faults, try a factory reset where applicable before swapping parts.
A systematic approach to Whirlpool Hot Water Heater Troubleshooting prevents misdiagnosis. In my experience, element and sediment issues are the most common causes of service calls.

Safety First: What to Shut Off and When
Safety is critical. Simple steps prevent injury and damage.
- For electric heaters, always turn off the circuit breaker before touching wiring or elements.
- For gas heaters, shut off the gas supply and ensure the pilot is out before disassembly.
- Relieve tank pressure by opening a hot water faucet and the T&P valve if needed.
- Use gloves and eye protection when draining or loosening valves to avoid scalds and debris.
I once underestimated residual heat and got scalded while loosening a drain valve. After that I drain more slowly and wear protection. Respecting these steps helps you complete Whirlpool Hot Water Heater Troubleshooting safely.

Parts, Tools, and Cost Estimates
Have the right tools and parts on hand. That speeds repairs and reduces trips to the store.
- Basic tools
- Adjustable wrench, screwdriver set, pliers, plumber’s tape, bucket, hose for draining.
- Multimeter for electrical checks and an element wrench for electric models.
- Common replacement parts
- Heating elements, thermostats, sacrificial anode rod, T&P valve, dip tube, drain valve.
- For gas models: thermocouple, gas control valve, igniter or pilot assembly.
- Typical cost ranges (varies by model and region)
- Heating element: low to mid price range.
- Thermostat: low price range.
- T&P valve: low to mid price range.
- Gas control valve or electronic board: mid to high price range.
- Full tank replacement: high cost; compare to repair costs if tank corrosion is present.
When I first started servicing Whirlpool Hot Water Heater Troubleshooting, I learned to keep common parts in a van. That saves customers money and time. Always match part numbers to your Whirlpool model to ensure fit and safety.

Preventive Maintenance and Best Practices
Routine care keeps your Whirlpool heater running longer and reduces emergency repairs.
- Flush the tank annually to remove sediment and improve heat transfer.
- Check the anode rod every 2–4 years and replace if more than 50% depleted.
- Test the T&P valve yearly by lifting it and letting it snap back; replace if it leaks.
- Set the thermostat at 120°F to limit scald risk and save energy.
- Insulate older hot water pipes to reduce heat loss and improve delivery.
These practical steps are inexpensive and effective. My clients who follow this schedule see fewer call-backs and longer tank life. Preventive maintenance is the best form of Whirlpool Hot Water Heater Troubleshooting.
When to Call a Professional
Some problems need a licensed tech. Don’t hesitate when risks are high.
- Major gas leaks or persistent pilot failures require a licensed gas technician.
- Persistent leaks from the tank shell indicate corrosion and need replacement by a pro.
- Complex electrical issues with control boards should be handled by a qualified electrician or technician.
- If you are uncomfortable working with gas or electricity, call a professional.
I often step in after DIY attempts fail or when code compliance is required. Calling a pro can save money and avoid hazards for complex Whirlpool Hot Water Heater Troubleshooting.
Frequently Asked Questions of Whirlpool Hot Water Heater Troubleshooting
How do I reset my Whirlpool electric water heater?
Reset an electric Whirlpool water heater by turning off the breaker, removing the access panel, pressing the reset (ECO) button on the upper thermostat, and turning power back on. If it trips again, test heating elements and wiring for faults.
Why does my Whirlpool heater make rumbling noises?
Rumbling usually means sediment has settled and is being heated under the element. Flushing the tank and checking the anode rod often fixes the issue in one maintenance session.
How often should I flush my Whirlpool hot water heater?
Flush your Whirlpool hot water heater at least once a year, or twice a year if your area has hard water. Regular flushing helps prevent sediment, improves efficiency, and reduces noise.
Can I replace a heating element myself?
Yes, replacing a heating element is a common DIY task if you turn off power and drain the tank partially. Use the correct element size for your Whirlpool model and follow safety steps to avoid shocks and leaks.
What temperature should I set my Whirlpool water heater to?
Set your Whirlpool water heater to 120°F for safe, energy-efficient hot water. This setting balances scald prevention and sufficient hot water for most homes.
How long should a Whirlpool hot water heater last?
A well-maintained Whirlpool hot water heater typically lasts 8 to 12 years, depending on water quality and maintenance. Replacing the anode rod and regular flushing can extend tank life.
Conclusion
Whirlpool Hot Water Heater Troubleshooting becomes simple when you follow a clear, safe process and perform regular maintenance. Start with symptom checks, isolate the cause, and use basic tools for common fixes like element or thermostat replacement and tank flushing. When in doubt, call a licensed technician for gas or major electrical issues. Take action now: check your heater’s settings, schedule a flush if needed, and keep a small tool kit and spare parts list handy. If this guide helped, leave a comment or subscribe for more practical home service tips.
